Custom Lockable Tin Box With Combination Lock Design Guide
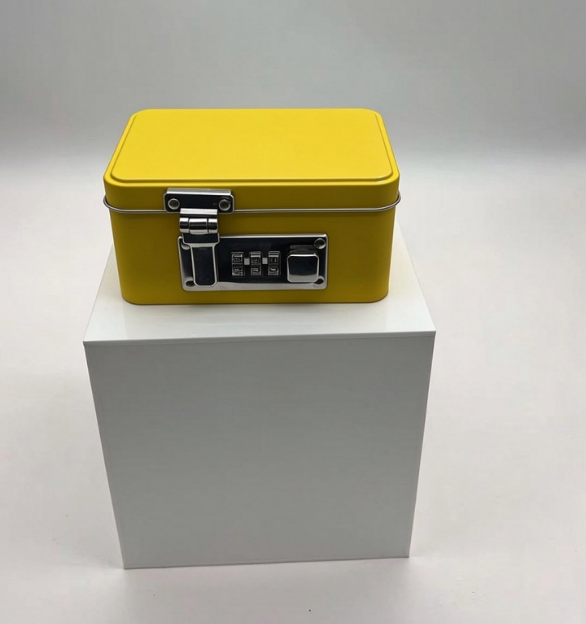
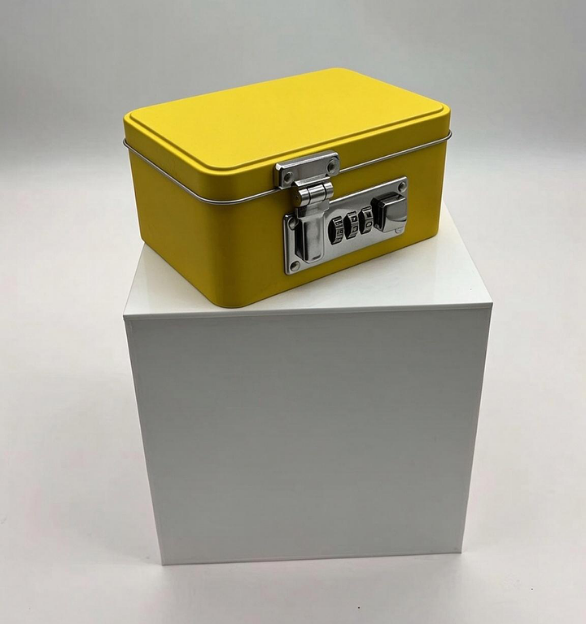
The supplied photographs show a yellow rectangular tin with rounded corners, a separate lid, an external latch, and a three-digit mechanical combination lock. This format can make the opening action part of a mystery-box campaign. It can also support limited-edition gifts, event kits, collectibles, or promotional challenges. The custom tin packaging unboxing guide covers the wider reveal sequence; this article concentrates on specifying the lockable pack itself.
Treat the lock as experience hardware rather than proof of high security. A lightweight metal pack with mounted fittings may discourage casual opening, but the photographs do not establish theft resistance, tamper evidence, child resistance, or food-contact suitability. Define the intended use first, then test the finished pack against that use.
Start With the Campaign and Product
Write the opening experience before choosing a code or lock. Identify who receives the box, what sits inside it, how the password reaches the recipient, when the box should open, and what happens if the code is lost. A trade-show challenge needs fast reset and support. A limited-edition gift may need a controlled clue sequence. An employee kit may need simple instructions that work without a public campaign page.
Measure the complete product envelope, including any pouch, insert, booklet, and clearance around the mounted hardware. If the program also depends on collecting or numbered releases, use the collectible tin design guide to define series logic before artwork begins. The lock should support the program, not become an isolated novelty that complicates packing and customer service.
Specify the Combination Lock Before the Tin
Choose whether the hardware uses a fixed factory code, a resettable user code, or a code controlled by batch. Confirm the number of dials, the readable direction, the reset method, and whether resetting is possible only while the box is open. Ask how the mechanism behaves after repeated operation and how a jammed or forgotten code is handled. These details affect instructions, returns, spare units, and campaign support.
Specify the lock body, latch, keeper plate, fasteners, backing support, and lid alignment as one assembly. The visible front plate in the photographs appears to combine the latch and code mechanism, while a keeper is fixed above it. Production drawings must confirm how those parts attach, which edges move, and how much clearance the action needs. Do not approve the lock on a loose hardware sample and assume it will behave the same on a formed and decorated tin.
Build the Password Reveal
The password cannot be trapped inside the locked box. Deliver it through an outer card, a separate email, a timed campaign page, an event clue, or another channel that matches the audience. Check that the code does not appear on a shipping label, packing slip, or product photograph before the intended reveal. If several codes are used, keep a controlled map between inventory, customer communication, and replacement units.
A three-digit consumer lock offers limited combinations and should not be presented as protection for cash, documents, or other valuables. Its strongest role is pacing access and creating participation. Plan a clear fallback for recipients who misread the clue, have limited hand strength or vision, or receive a unit with damaged hardware.
| Program choice | What it changes | What to approve |
| One preset campaign code | Simplifies packing but the code can spread beyond the intended audience | Code placement, reveal timing, support message, and fallback access |
| Different code by batch | Supports staged releases but increases code and inventory control work | Batch map, label control, rework process, and customer service access |
| Resettable user code | Adds ownership value but makes setup and recovery part of the experience | Reset sequence, instructions, error recovery, and repeated-use sample |
| Clue-based reveal | Turns opening into an activity and increases the risk of lost or unclear clues | Pilot completion rate, clue replacement, accessibility, and support path |
Allow Space for Mounted Hardware
External lock plates can reduce usable internal space where fasteners, folded tabs, rivets, or backing pieces project through the wall. Keep the product and insert away from moving parts. Define the maximum internal projection, protected clearance zone, and the force that the wall must withstand when the latch closes. A flat external face in a rendering does not prove that the inside remains clear.
Place mounting holes away from corner radii, beads, curls, seams, and heavily formed areas unless the tooling is designed for them. Check that the lid and body stay aligned after the hardware is attached. The sample should close without twisting the body, rubbing the print, or forcing the keeper out of position. The photographs do not provide dimensions, gauge, or fastening details, so those values belong in the supplier drawing rather than the marketing copy.
Protect the Product With the Right Insert
The insert must hold the product without blocking the latch, fasteners, or code dials. Define finger access and the removal path before selecting foam density or paperboard structure. The rectangular tin insert design guide explains how to control the dimensional stack for EVA inserts. A paperboard tray, pulp insert, or bagged product may be more appropriate when the campaign needs easier recycling or lower assembly effort.
Test the insert with the final product mass and the lock hardware installed. Watch for pressure on fasteners, rattle near the front wall, abrasion against the lid, and difficult product removal. If the box holds multiple surprise items, define count control and prevent one item from obstructing the latch during shipment.
Plan Artwork Around the Lock
The lock is a strong visual object. Decide whether the artwork frames it as part of the story or keeps the front panel quiet so the opening action remains obvious. Reserve clear zones around the keeper, latch path, fasteners, and dial window. Do not place small legal copy, a barcode, or a critical logo where the hardware can cover or distort it.
Approve color and registration on a formed sample with the actual hardware fitted. Follow the custom printed tins guide for dieline control and safe zones. If the lock plate is sourced separately, define its finish, color tolerance, scratch protection, and visual standard alongside the printed tin.
Prototype the Complete Opening Sequence
Use a staged approval sequence: hardware sample, formed unprinted tin, decorated sample with final fittings, filled pack, and shipping case. At each stage, record the code, opening steps, closing feel, latch alignment, and any interference. Define the required number of opening cycles from the real campaign instead of borrowing a generic test count.
The final review should cover code readability, reset behavior, accidental dial movement, latch engagement, sharp or exposed edges, coating rub, fastener looseness, product clearance, drop and vibration exposure, and the condition after transit. Keep an approved sample and controlled drawing. The tin box manufacturing process can help align artwork, sampling, hardware fitting, packing, and inspection approvals.
Define Claims and User Safety
Do not describe a combination-lock tin as child resistant because a child may not know the code. Child-resistant packaging is evaluated as a finished package under the applicable protocol. The child resistant tin box buying guide explains that separate evidence is needed. Keep mystery-box language, access-control language, and regulatory claims distinct.
Review pinch points at the latch, small detachable parts, edges around mounting holes, and the possibility of a finger being caught when the lid closes. If food, cosmetics, medicine, or another regulated product is involved, confirm the complete contact system and labeling for the target market. A sealed inner package can separate the product from the lock hardware, but it does not create child resistance or tamper evidence by itself.
Lockable Tin Box Request for Quotation Checklist
Include these items in one buyer brief:
- Campaign purpose, audience, packed product, quantity, target market, launch date, and expected reuse.
- Outside and usable inside dimensions, product envelope, filled weight, lid direction, and hardware clearance zone.
- Lock model, number of dials, fixed or resettable code, reset method, latch and keeper details, fasteners, and support plan.
- Password delivery method, batch or unit code control, clue materials, fallback access, and customer-service procedure.
- Printing, coating, lock-plate finish, artwork safe zones, insert material, pack-out, carton orientation, and scratch protection.
- Sample stages, opening and closing checks, transport tests, inspection limits, claim evidence, and approved reference sample.
Frequently Asked Questions
What is the best English keyword for a password tin box
Lockable tin box is the broad natural term. Combination lock tin box and tin box with combination lock describe the pictured mechanism more precisely. Password tin box appears in some product listings, but it is less consistent English for a buyer guide.
Can every box use the same code
It can if the campaign accepts that the code may be shared. Different batch or unit codes provide more control but add labeling, data, packing, and support work. Define the operating model before ordering hardware.
Is a combination lock tin child resistant
No such claim should be made from the lock type or photograph. Child resistance depends on the tested finished package and the applicable requirements for the product and market.
Can the tin be used as a safe
It should not be promoted as a safe unless the final product has evidence for a stated security level. A lightweight promotional tin with a three-digit lock is better described as controlled-access or lockable packaging.
Can a lockable tin hold food or candy
A sealed inner pouch or wrapped product can simplify separation from the hardware. Direct contact, food suitability, barrier performance, and labeling still need evidence for the complete final pack and target market.
Conclusion
A strong lockable tin box begins with a clear reveal plan and a measured product envelope. Specify the combination lock and latch as one assembly, reserve space for mounted hardware, coordinate the insert and artwork, test the complete opening sequence, and keep security and compliance claims narrow.
To discuss a sample and quotation, contact ShingWah Tins with the product dimensions, campaign idea, quantity, lock and code requirements, artwork stage, insert concept, target market, and delivery plan.
Technical note: The photographs do not establish dimensions, tinplate gauge, food-contact suitability, child resistance, tamper evidence, theft resistance, reset procedure, or load rating. Confirm the final drawing, hardware specification, production sample, and test plan before publishing performance claims.